David's First Birthday Bash

David turned ONE on Jan 22nd! I can hardly believe that he's already a year old. This year has truly gone by faster than any before it for me. I was looking at some pictures of David from when he was first born and was reminded of something my friend Miska said once about parenting, that it's the continual process of letting go. I can already sense that the changes ahead will be hard, but so beautiful nonetheless. I know that as David is able to eat all by himself and then able to put on his own clothes, it's important to remind myself that he will always need his mommy; it just changes in the ways that he needs me. My prayer is that he will come to know how deeply we love him and how deeply God loves him.


Kermit cake heads (sort of)...

Mocha cupcakes with espresso buttercream frosting and Chocolate covered pretzels (I forgot to put the fleur de sel on as they were drying so disregard the tag:))


We gave out some of the handmade marshmallows for favors...

Next up is Grandma with her hot cocoa moustache. To choose from was the Chevron, the Magician, the Texan and the Rich Uncle ..... she chose the Rich Uncle. Go Grandma!

And here's David with his daddy at the end of his party...

We love you, David!
Handmade Marshmallows ............ recipe from Alton Brown
Cranberry Curd Cups .......... recipe for cranberry curd from Not Without Salt
Hot Cocoa .......... recipe from Alton Brown
Mocha Cupcakes with Espresso Buttercream... recipe from Brown Eyed Baker
David's Chocolate Birthday Cake ...... All Recipes (this cake was so darn good)
Happy Birthday Banner ......... directions by Adventuroo
Moustaches ............ inspired by Pizzazzerie

Chili and Cornbread

I made quite a few things for Christmas, but forgot to take pictures. So I reverted back to choose from the many, many pictures I have of recipes I've made recently.
Finally! A recipe for chili that my husband really likes! I have been on an eternal search for a chili that Andrew likes better than Wendy's. I have tried quite a few recipes, and was close to giving up; each time I tried a new recipe, I would watch Andrew's face with childlike anticipation that maybe, just maybe this would be the one. I just couldn't come to terms with the fact that his favorite chili was from Wendy's. Now don't get me wrong, any gourmet cook would wince knowing that I like Campbell's cream of mushroom soup and jarred spaghetti sauce. I'm not usually a food snob, but I was determined to find chili that Andrew would like that didn't come from a fast food restaurant and also didn't taste like it. I really liked this chili, too so it's going in our regular rotation of meals that are soul-satisfying in winter. The golden cornbread pictured was a hit, too, so if you like sweet cornbread, this is the recipe for you!
Chili
2 lbs. ground chuck ( I used ground beef)
3 cloves garlic, minced
1 (14 oz) can tomato sauce
1 (10 oz) can Rotel tomatoes and chilies
1/2 t. salt
1 t. oregano
1 T. ground cumin
2 T. chili powder
1 (14 oz) can kidney beans, drained and rinsed
1 (14 oz) can pinto beans, drained and rinsed
1/4 c. Masa ( I omitted this)
Fritos
Grated cheddar cheese
Brown ground beef with garlic in a pot over med-hi heat. Add tomato sauce, Rotel, salt , oregano, cumin and chili powder. Cover and reduce heat to low. Simmer for 30 minutes. Add drained and rinsed beans and stir to combine. Cover and simmer for another 20 minutes.
If using the masa, mix with 1/2 c. warm water and add to the chili and stir to combine. Simmer for another 10-15 minutes. Serve chili with fritos and cheese. Mmmm....
Recipe from Pioneer Woman
Golden Sweet Cornbread
1 c. all-purpose flour
1 c. yellow cornmeal
2/3 c. sugar
1 t. salt
3 1/2 t. baking powder
1 egg
1 c. milk
1/3 c. vegetable oil (I used canola)
Preheat oven to 400 degrees F. Spray or lightly grease a 9" round cake pan. In a large bowl, combine flour, cornmeal, sugar, salt and baking powder. Stir in egg, milk and canola oil until well combined. Pour batter into prepared pan. Bake for 20-25 min, or until a toothpick comes out clean.
*This would be great baked in a cast-iron pan as well.
Recipe from All Recipes
Pumpkin Whoopie Pies with Mascarpone Filling

I made these whoopie pies last year for the first time, and I don't know why it took me so long to make them again. These are really moist and really yummy and if you like pumpkin then you're sure to like these. I was halfway into making the recipe when I discovered that I didn't have enough pumpkin puree in my cabinet. Thus began my journey across Massachusetts in search of pumpkin, where I heard the same thing repeated over again, "I'm sorry but we won't carry pumpkin until October." One grocery store gave me a little more info. Apparently, there is a pumpkin shortage (who would've thought?), so make sure you stock up when pumpkin does come out so that you can make these and make the infamous Libby's pumpkin roll as well! Even though I traveled across the world to get the puree for these (I finally got some from my mother-in-law), it was well worth it when I bit into one.
pumpkin whoopie pies with mascarpone filling
adapted from Martha Stewart's recipe found here
ingredients for the cookies:
3 c. all-purpose flour
1 t. salt
1 t. baking powder
1 t. baking soda1 1/2 T. ground cinnamon
1 t. ginger
1 t. ground cloves
2 c. firmly packed brown sugar
1 c. canola oil
3 c. pumpkin puree, chilled
2 large eggs
1 t. vanilla extract
ingredients for the filling:
16 oz. mascarpone cheese
2 c. powdered sugar (to taste)
Preheat oven to 350. Line two baking sheets with parchment paper and set aside.
In a large bowl, whisk together the flour, salt, baking powder, baking soda, and spices and set aside. In another large bowl, whisk together the brown sugar and oil until well combined. Add the pumpkin gold to this mixture until combined. Add in the eggs and vanilla and whisk again. Sprinkle the flour mixture over the pumpkin mixture and whisk until fully incorporated.
Using a small ice cream scoop or two spoons, drop heaping tablespoons of dough onto your lined baking sheets, spaced about 1 inch apart. Bake until toothpick comes out clean, about 15 minutes or 10 minutes for mini whoopie pies. Let cool on pan.
For the filling:
In the bowl of an electric mixture, whip cold mascarpone cheese until creamy(er). Pour in powdered sugar 1/4 c. at a time until reaches desired sweetness. The pumpkin cookies are fairly sweet, so I preferred the icing a little less sugary.
Put a dollop of icing between two cookies and sandwich together, pressing together slightly so the filling reaches the edges of the cookies. Refrigerate up to 3 days.
note: if you are making mini-whoopie pies, which are great if you're making these for a lot of people, use an extra-small ice cream scoop and the yield is about 3 dozen whoopie pies. I put the mini ones in decorative mini-cupcake liners to make them easier to eat.
Grilled Pizza
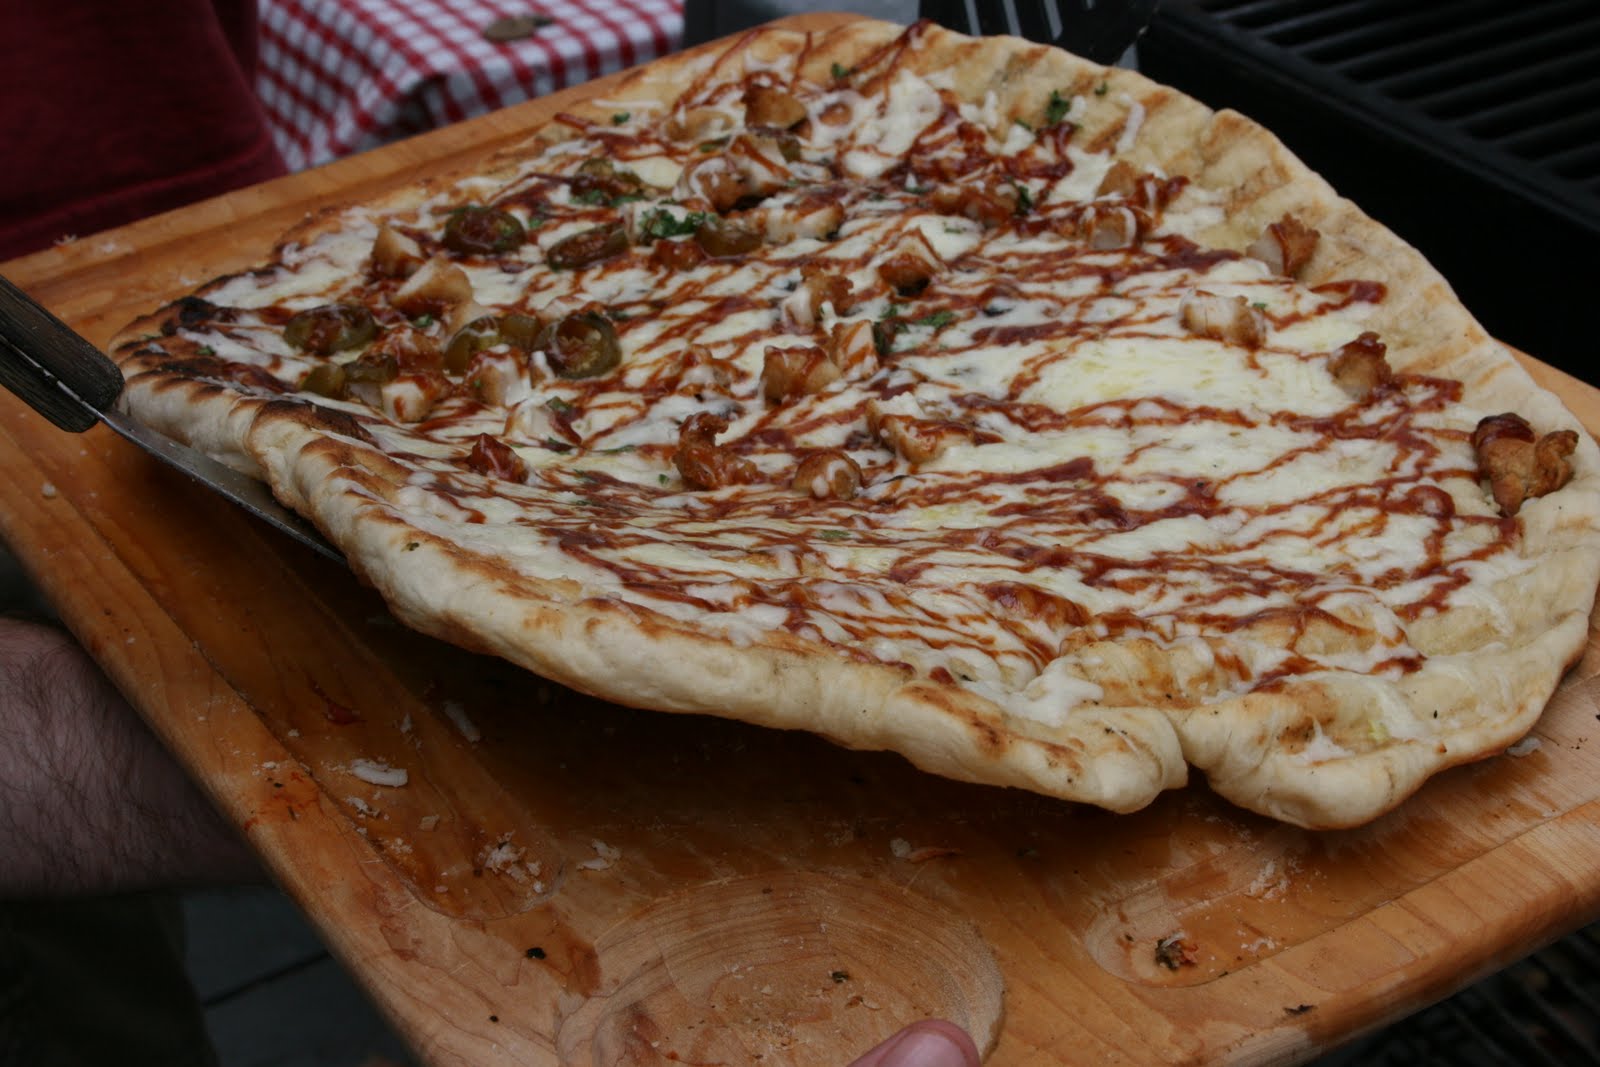
Is there anything better than BBQ chicken pizza? Well, yes, but not many when you grill it, too. We went over to Grandma and Papi's house for an early Labor Day, and we had a pretty good system grilling pizza for a lot of people. Don't be afraid to try this. The first time I tried to grill pizza, I vowed to never do it again because the dough ended up in an inedible, burnt, yet somehow gooey mess beside the grill.
Enter in Mike, however, a grill aficionado who grills almost anything well and he taught me the correct way to grill pizza. See below for how to get this goodness...

Grilled pizza
ingredients
pizza Dough (if you don't want to make it get it from your grocer)
olive oil
flour for dusting
Heat your grill on med-hi heat. Roll out your pizza dough to your desired shape and brush both sides with olive oil; if using multiple pizza crusts then place wax paper in between each dough after brushing with the oil.
Remove wax paper and place dough on very hot grill. Once it's almost ready to flip, the dough will start to bubble up (this means you're doing it right). You'll want the dough to have grill marks and be lightly browned. Flip the crust and repeat for the opposite side. Once dough is cooked, remove from grill and put desired toppings on. Return to grill to warm the toppings and melt the cheese, and then it's ready to eat!

bbQ chicken pizza
I made half of this pizza with chicken and jalapenos and half without...
ingredients
chicken (we used leftover chopped up nuggets from Chick-fil-A)
cilantro, chopped
fontina cheese, grated
mozzarella cheese, grated
parmigiano reggiano cheese
bbq sauce (Bull's Eye, taste test winner from Cook's Illustrated)
jalapenos
garlic infused olive oil
Follow directions above, but after pizza comes off the grill but before you put the other toppings on, brush one side of the crust with the garlic infused olive oil. (I pressed 2 cloves of garlic through a garlic press and mixed with olive oil) Spread grated fontina and mozzarella cheeses over crust. I hope this is making you hungry...
Sprinkle chopped cilantro over pizza, then use a squirt bottle to add the bbq sauce in a fancy shmancy pattern over the top. Add the chicken, and jalapenos if desired, and then grate the fresh parmesan over the top. Place the pizza back on the grill until the cheese melts. The bbq sauce on top caramelizes just slightly and melts in your mouth with all that delicious cheese. Hope you enjoy!
Another pizza option is to use homemade pesto, fresh tomatoes and fresh mozzarella with grated parmesan cheese, which is this pizza...
Before

After

Or use whatever toppings you'd like...this is Bob's perfectly arranged pizza:)

 Kaelyn is so good with David!
Guinness and Bailey's Irish Cream Cupcakes

These cupcakes are amazing and you need to try them. It has taken me awhile to post this recipe, but don't let it take you as long to make it. Everyone who had these cupcakes raved about them and I had people ask for the recipe. When I make these again, I won't go to the trouble of making the ganache to fill the cupcakes. Although the filling was good, the cupcakes really don't need it. I made some with and without the filling and many people preferred the ones without. These are perfect for St. Patrick's Day, which is when I made them.
Guinness and Bailey’s Irish Cream Cupcakes
Makes 24 cupcakes
Ingredients:
For the Guinness chocolate cupcakes:
1 c stout (Guinness)
16 T unsalted butter
¾ c unsweetened cocoa powder
2 c all-purpose flour
2 c sugar
1½ t baking soda
¾ t salt
2 large eggs
2/3 c sour cream
For the Bailey’s ganache filling:
8 oz. bittersweet chocolate, finely chopped
2/3 c heavy cream
2 T butter, at room temperature
2 t Bailey’s Irish cream
For the Bailey’s buttercream frosting:
8 T unsalted butter, at room temperature
3-4 c confectioners’ sugar, sifted
4-8 T Bailey’s Irish cream
Directions:
To make the cupcakes, preheat the oven to 350° F. Line two cupcake pans with paper liners. Combine the stout and butter in a medium saucepan over medium heat. Add the cocoa powder and whisk until smooth. Remove from the heat and allow to cool slightly.
In a large mixing bowl, combine the flour, sugar, baking soda and salt. In the bowl of an electric mixer fitted with the paddle attachment, beat together the eggs and sour cream to blend. Add the stout-butter mixture and beat just to combine. Mix in the dry ingredients on low speed just until incorporated. Divide the batter evenly between the cupcake liners, filling them about 2/3 full. Bake until a toothpick inserted in the center comes out clean, about 17 minutes. Allow to cool in the pan for 5-10 minutes, then transfer to a wire rack to cool completely.
To make the ganache filling, place the chocolate in a heatproof bowl. Heat the cream in a small saucepan until simmering, then pour it over the chocolate. Let sit for one minute and then whisk until smooth. If the chocolate is not completely melted, place the bowl over a double boiler or give it a very short burst in the microwave (15-20 seconds). Add the butter and Bailey’s and stir until combined.
Set aside to let the ganache cool until it is thick enough to be piped. You can use the refrigerator to speed the cooling process, but be sure to stir every 10 minutes or so to ensure even cooling. Also, don't let the ganache become too set or you won't be able to pipe into the cupcakes. Meanwhile, cut out a portion from the center of the cupcake using the cone method (use a paring knife or apple corer). Once the ganache has reached the correct consistency, transfer it to a plastic bag and snip the end off to pipe it into the cupcakes.
To make the frosting, place the butter in the bowl of a stand mixer fitted with the paddle attachment. Beat on medium-high speed until light and fluffy, about 2-3 minutes. Gradually add the powdered sugar until it is all incorporated. Mix in the Bailey’s until smooth. Add more if necessary until the frosting has reached a good consistency for piping or spreading. Frost and eat!
Source: from Annie's Eats, and originally adapted from Smitten Kitchen
Avocado and Arugula Pesto
 If you like pesto, you need to try this recipe. Avocado is used instead of olive oil, which makes this pesto much healthier than normal pesto recipes. I really love this stuff, and the pesto would be good as a dip or just straight off the spoon:) My husband even liked it... Hope you enjoy!
Linguine with Avocado and Arugula Pesto
Ingredients
1 lb. linguine pasta
2 medium avocados, halved
3 c. baby arugula leaves
1 c. packed fresh basil leaves
3 tbsp. fresh lime juice (about 2 limes)
2 cloves garlic, peeled and smashed
1/2 tsp. salt
1/2 tsp. freshly ground black pepper
1 c. grated Parmesan
1/2 cup sliced almonds, toasted (I didn't use these)
Cook's Note: To toast the almonds, arrange in a single layer on a baking sheet. Bake in a preheated 350 degrees F oven for 6 to 8 minutes until lightly toasted. Cool completely before using.
Bring a large pot of salted water to a boil over high heat. Add the pasta and cook until tender but still firm to the bite, stirring occasionally, 8 to 10 minutes. Drain and reserve about 1 cup of the pasta water. (*Make sure to reserve this water b/c you will need it*) Place in a serving bowl.
Using a spoon, scoop out the flesh from the avocados and place in a food processor. Add the arugula, basil, lime juice, garlic, salt, and pepper. Blend until smooth.
Pour the pesto over the pasta and toss together. Add the cheese and toss together until coated, adding the pasta water, as needed, to loosen the sauce. Add almonds if desired.
*I sauteed some chicken in garlic-infused olive oil to serve on top of the pasta.
from Giada De Laurentiis on The Food Network

Tomato Mozzarella Tart
Before we get to the tart, I just wanted to post some pictures of my son David. He just turned 6 months old and is it just me, or is he the most handsome little boy you've ever seen?

 Now on to the tart. This is a Tomato Mozzarella Tart with Basil-Garlic Crust from one of my favorite food blog sites, Annie's Eats. I have a lot of recipes that I want to try, but when you find one that has garlic, fresh mozzarella and fresh tomatoes it's hard to pass up. Although I don't know if I'll make this again, it was really good and the crust was unique. While this was cooking, the whole house smelled of garlic and basil...I'm making myself hungry thinking about it.
Tomato Mozzarella Tart with Basil Garlic Crust
Ingredients:
For the dough:
1/3 cup fresh basil leaves
1-2 cloves garlic
1¼ cups all-purpose flour
1/4 tsp. salt
8 tbsp. unsalted butter, chilled and cut into 8-10 pieces
4-5 tbsp. ice cold water
For the filling:
8 oz. fresh mozzarella, sliced
Ripe cherry tomatoes
Salt and pepper
1 tbsp. extra-virgin olive oil
Freshly grated Parmesan cheese
1-2 tbsp. minced fresh basil
Directions:
To make the dough, combine the basil and garlic in the bowl of a food processor. Process, scraping down the sides of the bowl as needed, until finely minced. Add the flour and salt; pulse briefly to combine. Add in the chunks of butter and pulse about 10 times, or until the mixture resembles pea-sized crumbs. Add 3 tablespoons of the water and pulse a few times to incorporate. Add 1 more tablespoon and process for several seconds to see if the dough forms a ball. If not, add the remaining tablespoon of water and process until a ball of dough forms. Remove the dough, flatten into a 5-inch disc, and wrap in plastic wrap. Refrigerate for at least 1 hour.
When you are ready to bake the tart, preheat the oven to 425.°
Transfer the chilled dough to a lightly floured work surface and roll out into a 12-inch circle. Lay the dough over a 9-inch round tart pan and press it into the sides. Trim the excess dough as needed or use it to reinforce the edges. Cut out a round piece of parchment paper to lay loosely over the tart dough and fill the center with baking beads. Bake in the preheated oven for 10-12 minutes. Remove from the oven and carefully remove the parchment and baking beads. Return the empty tart shell to the oven to bake for 5 minutes more. Remove from the oven and lower the heat to 375° F.
Layer the bottom of the pre-baked tart shell with the sliced mozzarella. Arrange the cherry tomato slices on top of the cheese in a single even layer. Season with salt and pepper. Drizzle with olive oil. Top with freshly grated Parmesan and minced fresh basil.
Bake about 30 minutes, or until the dough is golden brown and the cheese is bubbly and lightly browned in places. About halfway through baking, rotate the tart 180° and wick off any excess moisture that has collected on top with a towel if necessary (I did this twice during baking). Allow the tart to rest at least 5 minutes before slicing and serving.
from Annie's Eats, originally from Ezra Pound Cake and The Complete Italian Vegetarian Cookbook

